SPiCboard
Disclaimer
This page is all support we provide for programming from home or from your own computer. If this does not work, go to the CIP Pools.
Only one of the following options is necessary to be able to use the IDE.
Remote Access to the CIP with Xpra
To use the graphical interface of the SPiC IDE from home, it is necessary to install an Xpra client. To open the conncetion, Xpra has to be started on the command line. With the parameter start ssh:USER@COMPUTER.cip.cs.fau.de an Xpra session is started via a Secure Shell (one has to use its CIP username an a host such as cip6a0). The SPiC IDE is started by adding the parameters –exit-with-children –start-child="/proj/i4spic/bin/editor". The command then is:
xpra start ssh:BENUTZER@RECHNER.cip.cs.fau.de --exit-with-children --start-child="/proj/i4spic/bin/editor"
When using windows, the command is:
Xpra.exe start ssh:BENUTZER@RECHNER.cip.cs.fau.de --exit-with-children --start-child="/proj/i4spic/bin/editor"
For a list of available computers and more information about the CIP please visit the website of the CIP pools.
By using a virtual machine (VM)
Basics
By using a Virtual Machine (VM), a guest operating system (e.g., Debian Linux) can be started on your PC/notebook (host) – even when you're using a completely different operating system (z.B. Windows). When using a fully virtualized system, there is also a hardware abstraction included. The content of the virtual monitor can be displayed in a window (of arbitrary size), and the virtual disk is only a single file on the host system. If necessary, one can grant access to external devices (e.g., USB), other additions add dynamic scaling of the window or sharing the mouse between guest and host. With hardware-supported virtualization, there is usually no noticeable performance difference between guest and host. After the installation of virtualisation software, the user can add and delete various different VMs without impact on the host system (apart from the necessary storage space).
Requirements
For execution of the VM, a 64-bit architecture (AMD64/x86_64) with virtualization support is necessary. You may have to activate that in the BIOS, usually found by the names "Virtualization Technology", "VT-x" or "AMD-V" (more information in your computer's manual).
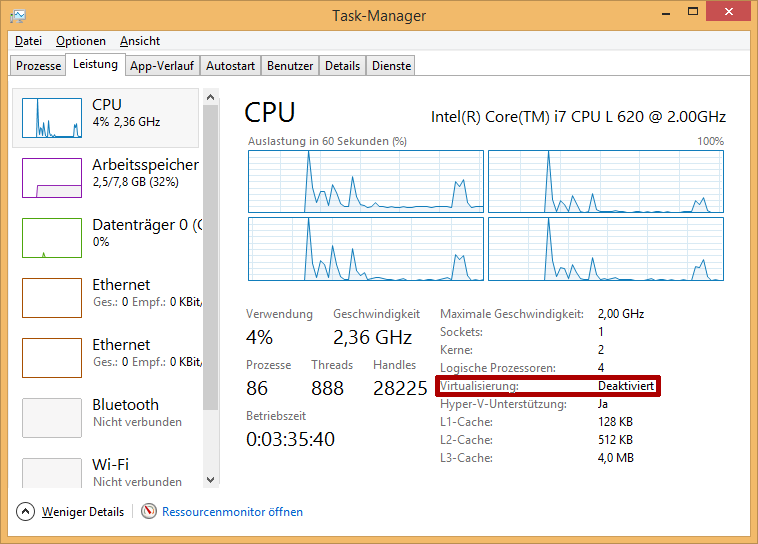
To test unter Windows whether the the support is activated, you can open the Task Manager, search for the CPU tab – in the main window the state Virtualization shall be visible.
No other hypervisor (such as Hyper-V) is allowed to run simultaneously, if so, it has to be deactivated deactivated beforehand.
Installation
For development from home, there is a virtual machine with the SPiC-IDE installed and a CIP-like environment (Debian). For this, you have to install VirtualBox on your computer. Sometimes it is needed to also install an Extension Pack, depending on your operating system:
- Windows: Download VirtualBox-6.1.32 und Extension Pack
- MacOS X: Download VirtualBox-6.1.32 und Extension Pack
- Linux: Package Sources and the suitable Extension Pack.
After installation, the VM has to be downloaded:
In VirtualBox, the VM can be loaded via File / Import Appliance....
User
The user and password are i4spic.
Similar to the CIP, the SPiC-IDE can be started by pressing the Windows key, then SPiC-IDE, or by clicking on the SPiC-IDE icon.
The IDE asks for a login, this is your idm-Kennung.
After that, the IDE asks for a directory, which is then created on the local VM automatically and synced with your project repository from the CIP pool.
You can enter any directory, e.g. spic.
Finally, the program asks for your CIP password.
Theoretically, you can programm the homework here and also submit it from there.
To check whether your submission was successful, you can execute ssh DEINE_KENNUNG@cipterm0.cs.fau.de /proj/i4spic/bin/show-submission in a terminal.
Additionally, there is the entry SPiC-IDE (remote CIP), which syncs your SPiC user directory from the CIP with the virtual machine.
- Note
- If the internet connection is lost, unsaved files can be lost. Please try to save the files on a regular basis and copy the files into the CIP – this is also possible via the editor, as both project directories are displayed there.
Weitere Möglichkeiten
The following instructions are to help for motivated and technically experienced students to connect their SPiCboard at home, and to program it, also beyond the scope of the course. This requires a certain gedree of individual initiative: The first source shall be the references on our website, which link to extensive references and tutorials for beginners. The usage of search tools also shall be visited before asking the tutors.